Menu
Start Free $129 Lifetime
Why is it the #1 bulk uploader?
- Insanely fast!
- Maintains folder structure.
- 100% automated upload.
- Supports RAW files.
- Privacy default.
How can you get started?
Download PicBackMan and start free, then upgrade to annual or lifetime plan as per your needs. Join 100,000+ users who trust PicBackMan for keeping their precious memories safe in multiple online accounts.
Trusted by users in 125+ countries.
“Your pictures are scattered. PicBackMan helps you bring order to your digital memories.”
How to Move Files from Shared With Me to My Drive?

Have you ever found yourself in a situation where someone shared an important file with you on a cloud storage platform, but you wanted to have it saved in your personal drive? If so, you're in the right place.
In this article, we will guide you through the process of moving files from the "Shared with me" section to your own drive on popular cloud storage services such as Google Drive. By following these simple steps, you'll be able to have all your important files organized and easily accessible in your personal storage.
In the age of digital collaboration, sharing files with others has become commonplace. However, it is often more convenient to have those files stored directly in your personal drive, where you can manage and access them easily.
This article will provide you with a step-by-step guide on how to move files from the "Shared with me" section to your own drive, ensuring that you have complete control over your files.
Understanding the "Shared with me" Section
Most cloud storage platforms, including Google Drive, have a dedicated section called "Shared with me." This section displays all the files and folders that have been shared with you by other users.
While these files are accessible to you, they are not stored in your personal drive by default. Moving them to your drive allows for better organization and easier access.
Benefits of Moving Files to Your Drive
There are several benefits to moving files from the "Shared with me" section to your personal drive:
- Organization: By having all your files in one location, you can easily find and manage them without navigating through multiple sections.
- Offline Access: When files are in your personal drive, you can access them even when you're offline, ensuring uninterrupted productivity.
- Quick Access: Storing files in your drive allows you to use features like shortcuts, making it faster to find and open frequently used files.
- Enhanced Collaboration: Moving files to your drive enables you to share them with others using your own permissions, granting you full control over who can access and edit the files.
Steps to Move Files from Shared With Me to My Drive
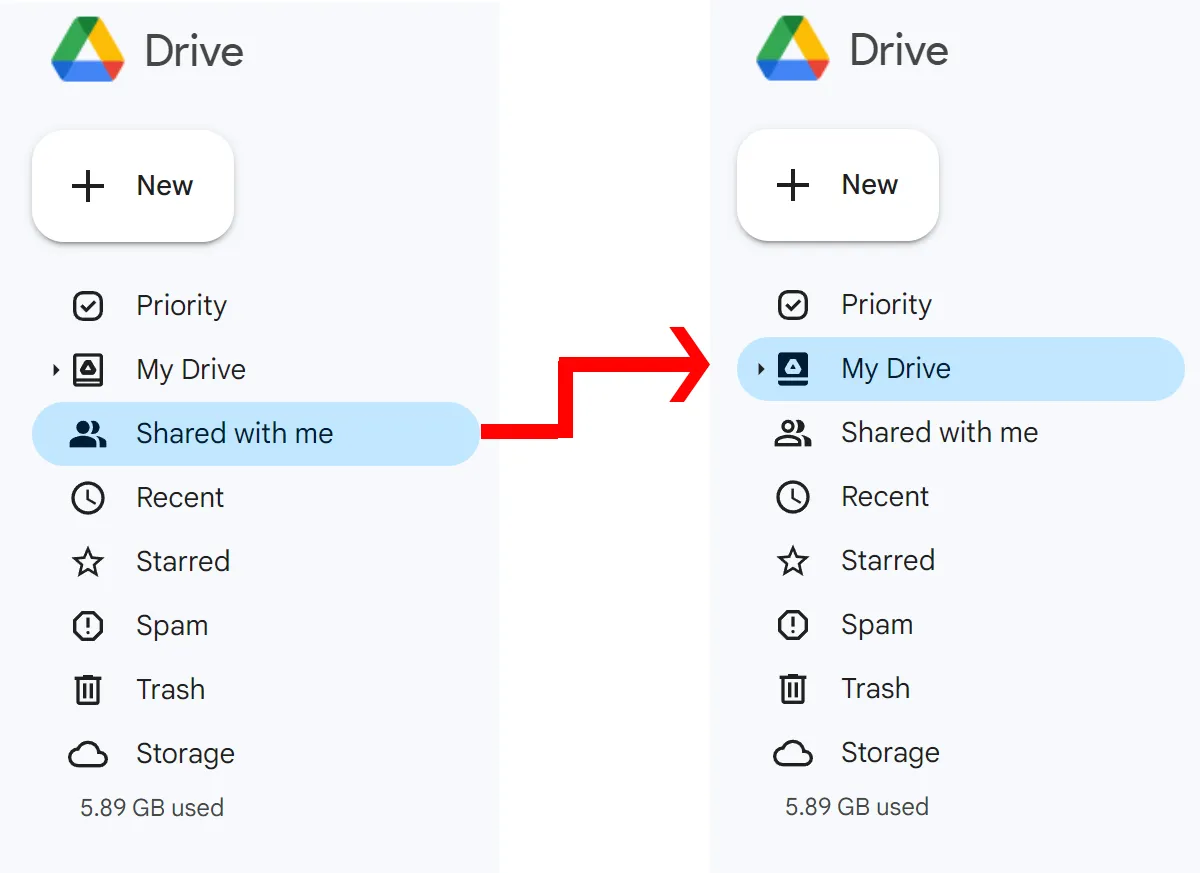
Step 1: Accessing the "Shared with me" Section
To begin the process, follow these steps:
- Open your cloud storage platform (e.g., Google Drive).
- Look for the "Shared with me" section in the navigation panel. Click on it to access the files shared with you.
Step 2: Selecting the Files You Want to Move
Once you are in the "Shared with me" section, follow these steps:
- Review the list of files and folders shared with you.
- Select the files you want to move to your drive. You can select multiple files by holding the Ctrl key (or Command key on Mac) while clicking on the files.
Step 3: Moving the Files to Your Drive
After selecting the desired files, follow these steps:
- Right-click on any of the selected files to open the context menu.
- From the options provided, choose "Add to My Drive" or a similar option that represents moving the files to your drive.
- The selected files will now be moved from the "Shared with me" section to your personal drive.
Quick Tip:
Photos are precious memories and all of us never want to ever lose them to hard disk crashes or missing drives. PicBackMan is the easiest and simplest way to keep your photos safely backed up in one or more online accounts.
Simply Download PicBackMan (it's free!), register your account, connect to your online store and tell PicBackMan where your photos are - PicBackMan does the rest, automatically. It bulk uploads all photos and keeps looking for new ones and uploads those too. You don't have to ever touch it.
Organizing Files in Your Drive
Now that you have successfully moved the files to your drive, it's important to keep them organized for easy retrieval. Consider the following tips:
- Create Folders: Group related files into folders based on projects, categories, or any other logical criteria.
- Use Descriptive Names: Give meaningful names to files and folders to quickly identify their contents.
- Apply Labels or Tags: Use labels or tags to further categorize and organize your files.
- Utilize Search: Take advantage of the search functionality within your cloud storage platform to find files quickly.
Conclusion
Moving files from the "Shared with me" section to your personal drive is a simple yet essential step to keep your files organized and easily accessible. By following the steps outlined in this article, you can take full control of your files and enjoy the benefits of having everything in one place.
Frequently Asked Questions (FAQs)
Q1: Can you move a folder from "Shared with me" to my drive?
Yes, you can move a folder from the "Shared with me" section to your drive. Simply select the folder you want to move and follow the steps mentioned in this article to move it to your drive.
Q2: How do I copy a shared folder to my drive?
To copy a shared folder to your drive, follow these steps:
- Open the shared folder in your cloud storage platform.
- Click on the folder to select it.
- Right-click on the folder and choose the "Make a copy" or similar option.
- The copied folder will now appear in your drive.
Q3: Why can't I see a shared folder on Google Drive?
There could be several reasons why you can't see a shared folder on Google Drive:
- Make sure you are logged in with the correct Google account that has access to the shared folder.
- Check if the folder was shared with a different email address.
- Ensure that the folder is still shared with you by the owner.
- Refresh your Google Drive page or try accessing the folder from a different device.
Q4: How do I move multiple files from "Shared with me" to my drive?
To move multiple files from the "Shared with me" section to your drive, follow these steps:
- Open the "Shared with me" section in your cloud storage platform.
- Select multiple files by holding the Ctrl key (or Command key on Mac) while clicking on the files.
- Right-click on any of the selected files and choose the option to move them to your drive.
- The selected files will now be moved to your personal drive.
Q5: What is the difference between a shared drive and a shared folder?
A shared drive is a feature available in certain cloud storage platforms, such as Google Drive, that allows teams or organizations to collaborate and store files collectively. It provides centralized management and control over files and folders, with the ability to set permissions at the drive level.
On the other hand, a shared folder is a folder that has been specifically shared with individual users. It is owned by a single user and can be accessed and modified by others who have been granted access. Shared folders are typically used for collaboration on specific projects or among smaller groups.
Q6: How to move all files and folders from one directory to another?
To move all files and folders from one directory to another, follow these steps:
- Open the source directory that contains the files and folders you want to move.
- Select all the files and folders by pressing Ctrl+A (or Command+A on Mac) or by clicking and dragging your mouse over the items.
- Right-click on any of the selected items and choose the option to cut or move.
- Navigate to the destination directory where you want to move the files and folders.
- Right-click in the destination directory and choose the option to paste or move the items.
- The files and folders will now be moved to the new directory.


