Why is it the #1 bulk uploader?
- Insanely fast!
- Maintains folder structure.
- 100% automated upload.
- Supports RAW files.
- Privacy default.
How can you get started?
Download PicBackMan and start free, then upgrade to annual or lifetime plan as per your needs. Join 100,000+ users who trust PicBackMan for keeping their precious memories safe in multiple online accounts.
“Your pictures are scattered. PicBackMan helps you bring order to your digital memories.”
How to Email Photos or Videos on iCloud.com?


In today's digital age, sharing precious moments with friends and family is easier than ever. iCloud.com, the web interface for Apple's iCloud service, provides a convenient platform for managing and sharing your photos and videos seamlessly.
This article will guide you through the process of emailing photos or videos directly from iCloud.com, allowing you to effortlessly send your captured memories to your loved ones. So, let's dive in!
iCloud.com is a web-based service that offers various features to manage your Apple devices and their associated data. Among its many capabilities, iCloud.com allows you to store and access your photos and videos from any internet-connected device, making it incredibly convenient.
Along with storage and accessibility, iCloud.com also provides tools to organize and share your visual content. In this article, we will focus on the process of emailing photos or videos directly from iCloud.com.
Understanding iCloud.com
Before we delve into the process, let's quickly familiarize ourselves with iCloud.com. It serves as a centralized hub where you can access and manage your iCloud data, including photos, videos, documents, contacts, and more.
By visiting iCloud.com, you can log in to your iCloud account and gain access to all your synchronized information.
How to Access iCloud.com

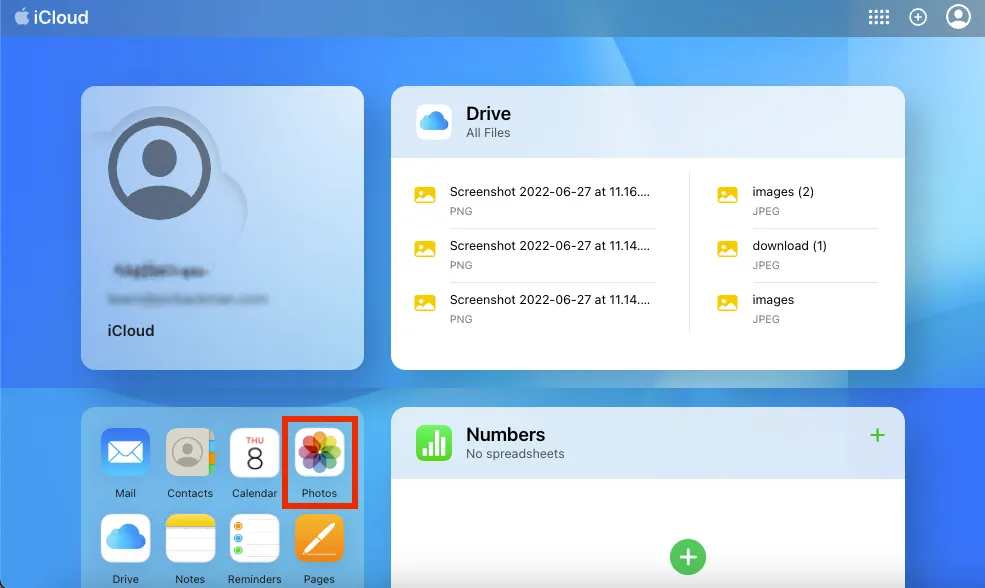
To begin, ensure you have a compatible web browser and a stable internet connection. Open your preferred web browser and navigate to iCloud.com. Sign in to your iCloud account using your Apple ID and password. Once logged in, you will be greeted with the iCloud.com dashboard, which provides access to various iCloud services.
Uploading Photos and Videos to iCloud.com
To email photos or videos from iCloud.com, you must first upload them to your iCloud Photo Library. Here's how you can do it:
Step 1: Accessing the Photos App on iCloud.com

Click on the "Photos" icon on the iCloud.com dashboard to launch the Photos app. This app allows you to manage and view your entire photo and video library.
Step 2: Uploading Photos and Videos
In the Photos app, click on the "Upload" button, usually represented by a cloud with an upward arrow. This action will open a file picker that enables you to select the desired photos and videos from your computer's local storage.
Choose the files you wish to upload and click "Open" or the equivalent button on your browser. iCloud.com will then begin uploading the selected media to your iCloud Photo Library.
Backup & Transfer your Photos in Minutes
Trusted by users in 125+ countries.
Organizing Photos and Videos on iCloud.com
Once your photos and videos are uploaded to iCloud.com, you can organize them into albums, making it easier to locate and share specific moments. Let's explore how you can create albums and add photos and videos to them.
Creating Albums
To create a new album, open the Photos app on iCloud.com and click on the "Albums" tab. Next, click on the "+" button, usually located near the top right corner of the interface. Enter a name for the album and press "Enter" or the equivalent button on your browser. Your new album will now appear in the Albums list.
Adding Photos and Videos to Albums
To add photos or videos to an existing album, open the album in the Photos app. Click on the "Add" button, typically represented by a "+" icon, and choose the media files you want to add from your iCloud Photo Library. The selected items will be added to the album, allowing for better organization and easier access.
Sharing Photos and Videos via Email on iCloud.com
Now that your photos and videos are organized within albums, you can proceed to share them via email directly from iCloud.com. Here's how you can do it:
Step 1: Composing a New Email on iCloud.com
On the iCloud.com dashboard, click on the "Mail" icon to access the web-based email client. Click on the "Compose" button to create a new email.
Step 2: Attaching Photos and Videos to the Email
In the email composition window, you will find an attachment button, usually represented by a paperclip icon. Click on it to open the file picker.
Navigate to the "Photos" section and select the desired album or individual photos and videos you wish to attach. Once selected, click "Choose" or the equivalent button on your browser.
Sending the Email with Photos and Videos
After attaching the photos and videos to your email, proceed with composing the rest of the message, including the recipient's email address, subject, and any additional text you wish to include.
Once you are satisfied with your email, click on the "Send" button, typically represented by a paper plane icon. iCloud.com will then send your email with the attached photos and videos to the intended recipient.
Quick Tip Before You Email Photos or Videos on iCloud.com
Photos & videos are precious memories and all of us never want to ever lose them to hard disk crashes or missing drives. PicBackMan is the easiest and simplest way to keep your photos/videos safely backed up in one or more online accounts.
Simply download PicBackMan (it's free!), register your account, connect to your online store and tell PicBackMan where your photos/videos are - PicBackMan does the rest, automatically. It bulk uploads all photos and keeps looking for new ones and uploads those too. You don't have to ever touch it.
Conclusion
Emailing photos or videos on iCloud.com is a straightforward process that allows you to conveniently share your precious memories with others. By leveraging the capabilities of iCloud.com, you can store, organize, and send your visual content seamlessly.
Whether it's a family gathering, vacation, or special event, you can now easily spread joy and keep your loved ones connected through the power of iCloud.com.
FAQs
How do I attach iCloud photos to an email?
To attach iCloud photos to an email, open the Photos app on your device, select the photos you want to attach, tap the share button (usually represented by a square with an upward arrow), and choose the "Mail" option. This will open a new email with the selected photos attached.
Can I share iCloud photos with non-Apple users?
Yes, you can share iCloud photos with non-Apple users. When you share a photo from iCloud, you have the option to generate a shareable link that can be sent to anyone, regardless of their device or operating system. Non-Apple users can view the shared photos through the web browser by accessing the provided link.
How do I share my entire photo library on iCloud?
Sharing your entire photo library on iCloud can be done by enabling the iCloud Photo Library feature on your Apple device. Go to Settings > [Your Name] > iCloud > Photos and toggle on the "iCloud Photo Library" option. This will upload and sync all the photos from your device to your iCloud account, allowing you to access and share them across multiple devices.
How to transfer photos from iPhone to PC?
There are several methods to transfer photos from an iPhone to a PC. One common way is to connect your iPhone to the PC using a USB cable. Once connected, open the File Explorer on your PC, locate your iPhone under "This PC" or "My Computer," and navigate to the "DCIM" folder. From there, you can copy and paste or drag and drop the desired photos to a location on your PC.
How do I know if my photos are on my iPhone or iCloud?
To determine whether your photos are on your iPhone or iCloud, open the Photos app on your iPhone and check if the photos are visible in the app. If your photos are stored in iCloud, you will see a message indicating that the photos are being optimized for your device. You can also go to Settings > [Your Name] > iCloud > Photos on your iPhone to verify the status of your iCloud Photo Library.
Will turning off iCloud Photos delete my photos?
No, turning off iCloud Photos will not delete your photos. If you choose to disable iCloud Photos, it will simply stop syncing new photos and videos to your iCloud account. However, the photos and videos that were previously uploaded to iCloud will remain in your iCloud Photo Library and on your device. It's always recommended to back up your photos before making any changes to ensure their safety.


