Menu
Start Free $129 Lifetime
Why is it the #1 bulk uploader?
- Insanely fast!
- Maintains folder structure.
- 100% automated upload.
- Supports RAW files.
- Privacy default.
How can you get started?
Download PicBackMan and start free, then upgrade to annual or lifetime plan as per your needs. Join 100,000+ users who trust PicBackMan for keeping their precious memories safe in multiple online accounts.
Trusted by users in 125+ countries.
“Your pictures are scattered. PicBackMan helps you bring order to your digital memories.”
How to Migrate Photos from Google Photos to Apple Photos App?

In today's digital era, our precious memories are often captured and stored in the form of digital photos.
With the popularity of cloud-based photo storage services, many users have embraced platforms like Google Photos and Apple Photos App to safely store and manage their photo collections.
However, circumstances may arise where you decide to switch from one platform to another.
If you're currently using Google Photos and are interested in migrating your photos to the Apple Photos App, this article will guide you through the process.
Migrating photos from one platform to another can be a daunting task, but with the right approach and understanding, it can be accomplished smoothly.
In this article, we will explore various methods to transfer your photos from Google Photos to the Apple Photos App, ensuring that your cherished memories seamlessly transition to the new platform.
Why consider migrating from Google Photos to Apple Photos App?
There can be several reasons why you might want to migrate your photos from Google Photos to the Apple Photos App.
One primary reason could be the desire to consolidate all your media and have a unified ecosystem if you primarily use Apple devices.
Another reason could be the availability of specific features or functionalities in the Apple Photos App that cater to your needs better. Whatever the reason may be, the migration process is essential to ensure a smooth transition without losing any of your precious memories.
Preparing for the migration process
Before diving into the migration process, it's crucial to make some preparations to ensure a successful transfer of your photos. Here are a few essential steps to follow:
Checking compatibility and requirements
Before proceeding, ensure that your Apple device meets the necessary requirements for using the Apple Photos App. Check the system requirements and make sure you have the latest version of the app installed.
Additionally, ensure that you have enough available storage space on your device to accommodate your photo collection.
Organizing and backing up Google Photos
To make the migration process more streamlined, it's a good practice to organize your Google Photos library. You can create albums or tag photos to easily locate specific moments later.
Additionally, it's highly recommended to back up your Google Photos library to ensure you have a copy of your photos in case anything goes wrong during the migration process.
Methods to migrate photos from Google Photos to Apple Photos App
There are multiple methods available to transfer your photos from Google Photos to the Apple Photos App. Let's explore three commonly used methods:
Method 1: Using the Google Takeout service
Google Takeout is a service provided by Google that allows users to export their data from various Google services, including Google Photos. Follow the steps below to migrate your photos using this method:
- Visit the Google Takeout website and sign in with your Google account.
- Select the "Deselect all" option and then scroll down to locate and select "Google Photos."
- Customize the export settings according to your preferences, such as file type, photo quality, and album inclusion.
- Click on the "Next" button and choose your preferred delivery method, which can be a direct download link via email or saving the exported files to cloud storage services like Google Drive or Dropbox.
- Wait for Google to prepare your photos for download and follow the instructions to retrieve the exported files.
Method 2: Manually transferring photos
If you prefer a more hands-on approach, you can manually transfer your photos from Google Photos to the Apple Photos App. This method allows you to have more control over the selection and organization of your photos. Here's how you can do it:
1. Transferring photos via a computer:
- On your computer, open Google Photos and sign in with your Google account.
- Select the photos you want to transfer and download them to your computer using the download option.
- Connect your Apple device to the computer and open the Apple Photos App.
- Import the downloaded photos into the Apple Photos App.
2. Transferring photos via an iPhone or iPad:
- On your iPhone or iPad, open the Google Photos app and sign in with your Google account.
- Select the photos you want to transfer and tap the share button.
- Choose the "Save to Files" option and save the photos to the Files app.
- Open the Files app, locate the saved photos, and select them.
- Tap the share button again and choose the "Save Image" option to import the photos into the Apple Photos App.
Method 3: Using third-party apps or services

If you prefer a more automated and hassle-free approach, there are several third-party apps and services available that can assist you in migrating your photos. These apps provide user-friendly interfaces and advanced features to ensure a smooth transfer process.
Explore the available options, read reviews, and choose a reliable app or service that suits your needs. Follow the instructions provided by the chosen app or service to transfer your photos to the Apple Photos App.
By using Picbackman, you can simplify the migration process and ensure the safe transfer of your photos with just a few clicks. It offers options to customize your transfer preferences and provides a reliable and efficient way to migrate your Google photos to the Computer.
Step-by-step guide for Method 1: Using the Google Takeout service
Method 1 involves using the Google Takeout service to export your photos from Google Photos. Follow these step-by-step instructions to migrate your photos:
- Visit the Google Takeout website (https://takeout.google.com) and sign in with your Google account credentials.
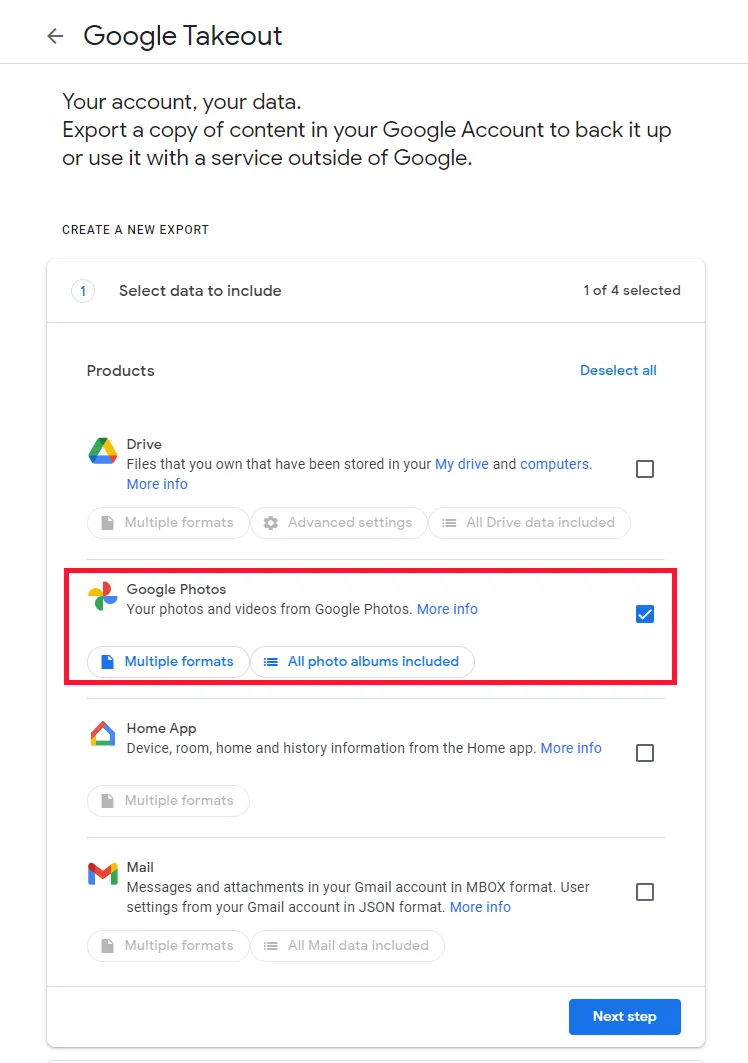
- On the "Create a new export" page, click on the "Deselect all" option to clear the selection.
- Scroll down and locate "Google Photos" in the list of available services.
- Click on the checkbox next to "Google Photos" to select it.
- Customize the export settings by clicking on the "All photo albums included" option. Here, you can choose specific albums or include all photos.
- Scroll down and click on the "Next" button to proceed.
- On the next page, select your preferred export options, such as the file type, photo quality, and size.
- Adjust any other settings according to your preferences.
- Scroll down and click on the "Create export" button to initiate the export process.
- Google will start preparing your photos for export. This may take some time, depending on the size of your photo collection.
- Once the export is ready, you will receive an email notification with a download link or instructions to retrieve the exported files.
- Follow the instructions provided in the email to download and save the exported photos to your computer or cloud storage.
Step-by-step guide for Method 2: Manually transferring photos
Method 2 involves manually transferring your photos from Google Photos to the Apple Photos App. This method allows you to selectively choose and organize your photos. Here's a step-by-step guide for transferring photos via a computer and an iPhone or iPad:
1. Transferring photos via a computer:
- Go to https://photos.google.com/ and sign in to your account.
- Select the photos which you want to migrate.
- Click "Download" icon located at the top right corner on the screen.
- Your browser prompts you about .zip file, then click on "Save" and specify a location to download. The downloaded zip file will contain all the photos from the Google Photos account.
- Your photos will now be downloaded in "Downloads" folder on your Mac.
- Extract or unzip your photos.
- Open "Photos" app on your Mac.
- Click "File" menu bar.
- Select "Import" option.
- Click "Downloads" folder located at the side bar and select the photos that you want to migrate.
- Click "Review for Import" button.
- Click "Import All Photos" button located at the top right corner on the screen.
- This is how you can migrate photos from Google Photos to Apple Photos app.
2. Transferring photos via an iPhone or iPad:
- On your iPhone or iPad, open the App Store and install the Google Photos app if you haven't already.
- Open the Google Photos app and sign in with your Google account credentials.
- Browse your photo library and select the photos you want to transfer. You can select multiple photos by tapping and dragging your finger across the screen.
- Once you've selected the photos, tap the share button.
- In the share menu, select the "Save to Files" option.
- Choose a location to save the photos in the Files app, and tap the "Save" button.
- Open the Files app on your iPhone or iPad.
- Navigate to the location where you saved the photos, and select them.
- Tap the share button again, and choose the "Save Image" option.
- The photos will be imported into the Photos app on your iPhone or iPad, and you can organize them as desired.
Step-by-step guide for Method 3: Using third-party apps or services
Method 3 involves using third-party apps or services to facilitate the migration process. Here's a general step-by-step guide for using third-party apps or services:
- Research and identify reliable third-party apps or services that specialize in photo migration between platforms.
- Read user reviews and ratings to ensure the app or service meets your requirements.
- Install the chosen app from the App Store or visit the service's website.
- Follow the provided instructions to connect your Google Photos account and grant necessary permissions.
- Select the photos you want to transfer and initiate the migration process as guided by the app or service.
- Wait for the transfer to complete. The duration may vary depending on the size of your photo collection and the speed of your internet connection.
- Once the transfer is complete, verify that all your photos have been successfully migrated to the Apple Photos App.
- Organize your photos and create albums or folders within the Apple Photos App to easily manage your collection.
Post-migration considerations
After successfully transferring your photos to the Apple Photos App, there are a few post-migration considerations to ensure a seamless experience:
Checking transferred photos in Apple Photos App
It's essential to verify that all your transferred photos are accessible and viewable in the Apple Photos App. Open the app and browse through your photo library to ensure that no photos are missing or corrupted during the migration process.
If any issues arise, refer to the backup copies you created before the migration or consult the respective app or service support.
Organizing and managing photos in the new app
Take some time to organize your transferred photos within the Apple Photos App. Create albums, apply tags or keywords, and utilize the available organizational features to make it easier to find specific photos in the future.
Additionally, familiarize yourself with the editing and sharing features of the Apple Photos App to enhance and share your memories effortlessly.
Conclusion
Migrating your photos from Google Photos to the Apple Photos App may initially seem overwhelming, but with the right approach, it can be a smooth and successful process. By following the methods outlined in this article, you can safely and efficiently transfer your cherished memories to the new platform.
Remember to back up your photos before starting the migration and take the time to organize and manage your collection in the Apple Photos App. With a little patience and attention to detail, you can seamlessly transition to the Apple Photos App and continue enjoying your photos on your preferred platform.
FAQs
How do I download photos from Google Drive to Apple Photos?
To download photos from Google Drive and import them into Apple Photos, follow these steps:
- Open Google Drive on your computer.
- Locate the photos you want to download.
- Select the photos by holding the Ctrl key (or Command key on Mac) and clicking on each photo.
- Right-click on the selected photos and choose "Download."
- Once the photos are downloaded, open the Apple Photos app on your computer.
- Drag and drop the downloaded photos into the Apple Photos app, or use the Import option within the app to import the downloaded photos.
How do I import photos into Apple Photos?
To import photos into Apple Photos, follow these steps:
- Open the Apple Photos app on your computer.
- Connect your device (such as a camera or iPhone) to your computer using a USB cable.
- The Apple Photos app should automatically detect the connected device.
- Click on the Import tab or button in the Apple Photos app.
- Select the photos you want to import from the connected device.
- Click on the Import button to start importing the selected photos into the Apple Photos app.
How do I move photos from Google Photos to another app?
To move photos from Google Photos to another app, follow these general steps:
- Open Google Photos on your computer or mobile device.
- Select the photos you want to move by clicking or tapping on them.
- Use the sharing feature in Google Photos to export or save the selected photos to your device.
- Open the other app where you want to move the photos.
- Use the import or upload feature in the other app to select and import the photos from your device.
Please note that the specific steps may vary depending on the app you are using to move the photos.
How do I move photos from Google Photos to photos on Mac?
To move photos from Google Photos to the Photos app on a Mac, you can follow these steps:
- Open Google Photos in a web browser on your Mac.
- Select the photos you want to move by clicking on them.
- Click on the "More options" menu (represented by three dots) and choose the "Download" option.
- The selected photos will be downloaded to your Mac.
- Open the Photos app on your Mac.
- Drag and drop the downloaded photos from your Mac's file explorer into the Photos app to import them.
How do I export all photos from Google Photos?
To export all photos from Google Photos, you can use the Google Takeout service. Here's how:
- Visit the Google Takeout website (https://takeout.google.com) on your computer.
- Sign in with your Google account if prompted.
- On the "Create a new export" page, click on the "Deselect all" option to clear the selection.
- Scroll down and locate "Google Photos" in the list of available services.
- Click on the checkbox next to "Google Photos" to select it.
- Customize the export settings if desired.
- Scroll down and click on the "Next" button to proceed.
- Choose your preferred delivery method, such as a direct download link via email or saving the exported files to cloud storage services.
- Click on the "Create export" button to initiate the export process.
- Google will prepare your photos for export, and you will receive an email with a download link or instructions to retrieve the exported files.


